#Check Printing Software Free
Explore tagged Tumblr posts
Visit Tumblr Blog
Explore Tumblr blogs with no restrictions, modern design and the best experience.
Last Seen Tumblr Blogs


Fun Fact
BuzzFeed published a report claiming that Tumblr was utilized as a distribution channel for Russian agents to influence American voting habits during the 2016 presidential election in Feb 2018.
Text
Check Printing Software Free
0 notes
Text
Free or Cheap German Learning Resources for all your Hochdeutsch Needs
I will update this list as I learn of any more useful ones. If you want general language learning resources check out this other post. This list is German specific. Find lists for other specific languages here.
For the purposes of this list "free" means something that is either totally free or has a useful free tier. "Cheap" is a subscription under $10USD a month, a software license or lifetime membership purchase under $100USD, or a book under $30USD. If you want to suggest something to add to this list, include things in this price range that are of good quality and not AI generated.
WEBSITES
DW - A public broadcasting service from Germany that also has a German learning section. They have videos, tv series, and lessons from beginner to advanced. The website is free to use with an account.
Gothe Institut - An organization affiliated with the German government that administers language level tests and promotes German culture abroad. They have a lot of free exercises and test questions. If you're willing to pay they may also have classes available in your region.
thegermanproject.com - A free website with explanations of beginner German concepts and stories to read for people at the beginner level.
germancorrector.com - A free website that will correct your spelling and grammar. You can also set the dialect to Switzerland or Austria.
Your Daily German - A blog in English by a native German speaker named Emanuel who makes posts about grammar, vocabulary, tips, and suggestions for reading.
YOUTUBE CHANNELS
Comprehensible Germani - A comprehensible input channel with German lessons in German using visual aids. Has content from beginner through upper intermediate.
Learn German - A channel that explains certain concepts and provides listening practice. The channel uses a mix of German and English.
Chill German - A channel that makes vlogs in slow German. They have videos from beginner to lower advanced levels.
Natürlich German - A comprehensible input channel that talks about different aspects of German culture and other topics as well. Has videos for complete beginner to lower advanced. This channel hasn't updated in a while but there's a large archive to watch through.
Easy German - A channel that has a combination of videos about basic German phrases for beginners and videos with interviews on the street in German speaking regions. The channel has dual language German/English subtitles on screen. The hosts of this channel also have a podcast for intermediate to advanced learners.
Expertly German - A channel about learning German with discussion of grammar, vocab, and business German. The channel is entirely in German.
Deutsch Mit Lari - A channel with a mix of German Lessons and vlogs in slow German. Content ranges from beginner to intermediate. All content and explanations are in German.
Learn German With Anja - A channel with a mix of lessons and videos on culture and living in Germany. Videos are in a mix of both English and German and often have dual language subtitles on screen.
READING PRACTICE
German graded readers by Olly Richards Short Stories in German, Intermediate Short Stories in German, Conversations in Simple German, Western Philosophy in Simple German, World War 2 in Simple German. Books tend to range from $4-$20 depending if you buy the digital or print versions. The books can also generally be found easily at used book stores or used on Amazon for cheaper.
Dino Lernt Deutsch - A series of short stories for beginners about a man named Dino lost in various German speaking countries. The full series new in print costs about $25 but it can be bought used or as a digital edition. Each individual story can also be bought separately
Nachrichtenleight - A website with news articles in simple German. The website is entirely in German.
AlumniPortal - Website with articles about business, academics, and other related topics organized by difficulty level. Has articles from upper beginner to upper intermediate. The website is entirely in German.
Grimm Stories - A website with an archive of the original Grimm's fairy tales. Language may be a bit archaic. The website is available in multiple languages.
PODCASTS
Slow German Podcast - Advertises itself as being for beginner to lower intermediate. The host talks about everyday topics such as seasonal weather and describing your apartment.
Easy German Podcast - The hosts from the Easy German Youtube channel talk about different topics, news, and answer questions from listeners in clear and understandable German.
News in Slow German - It is a podcast with news in slow German, including international news and culture news. Only a small section of the program is available for free.
Top-Thema Mit Vokalbeln - A podcast from DW for lower intermediate learners that discusses news topics in simple German and provides vocabulary lists related to the episode topic.
German Stories - A podcast for beginners in a mix of English and German that gives lessons through dialogues and short stories.
Speaking of Berlin - A podcast by Babbel of Berliners telling personal stories in slow German.
SELF STUDY TEXTBOOKS AND DICTIONARIES
Complete German All-in-One from McGraw Hill - a textbook that also doubles as a workbook. It’s more expensive at about $30. It’s difficult to find intact used copies of this book because it’s also a workbook and people tend to write all over it and tear it up. However the sentence builder and grammar sections are sold separately for much cheaper if you just want one or the other.
German Made Easy - Individual books in this series tend to be about $10-$20. From what I’ve read it’s just fine but it’s cheap and has all the beginner concepts you need and used copies are fairly easy to find online.
Easy German Step By Step - This is McGraw Hill’s budget option at $12-$16 new. Though as this one isn’t a workbook, it’s easier to find used copies. It focuses hard on only the most frequently used vocabulary and grammar concepts to get someone started as quickly as possible. It’s also available in audiobook form.
German Grammar Complete - This book is a full comprehensive guide to all levels of grammar from absolute beginner to college level. However it’s on the more expensive side at $30 and the workbook is sold separately.
DK German to English illustrated dictionary - This dictionary is sorted by topic and includes pictures and English translations. This is a new edition and is slightly harder to find used as I’m writing this. The base price is about $20 but there are older editions of this dictionary that might be easier to find used.
Merriam-Webster’s German to English Dictionary - The OG. The legend. The menace. The classic bilingual dictionary. Simple. Many words. Decent explainations. Only $8 new. Easy to find used older editions.
SERIES FOR LEARNERS AND KIDS TV
Hallo Aus Berlin - A series infamous among German students everywhere. Made in the early 2000s for use in classrooms, it has ten episodes of kids talking about certain topics like numbers and going out to a restaurant. It also has a number of songs. It’s cringey but in a fun way in my opinion.
Löwenzahn - a kids tv series aimed at very young audiences that’s been on for several decades. Every episode discusses one topic like bridges or factories so you’ll hear certain words repeated a lot. Theres only been a couple of different hosts so the presentation style remains consistent and unlike some other shows for kindergarteners it’s not obnoxiously loud and can be enjoyable for adults.
Sesamstraße - Sesame Street in German and localized for the German market with different themes and characters. In their YouTube channel you can find clips from as far back as the 1970s.
180 notes
·
View notes
Text
Murderbot 3D Print Part 3 - FILES!!!
It's what many of you have been waiting for! THE 3D FILES!
The price??? It's free!
That's a lie, the price is actually that you send me pictures of the results so I can have the joy of seeing what you all make. (I mean it, this is a threat)
Based on comments so far, it seems like this will be the first dive into 3D printing and figure painting for some people so I'll go through some of my approach to give you an idea of how I got to this result.
This is actually my first time sculpting, printing and then painting something to completion, so I am not experienced and you can totally do it too. As you may see from my blog I am primarily a digital artist and I occasionally do gouache and ink work, I have literally never painted or sculpted a figure before. (This counts as foreshadowing if you run into any problems with my files lmao)
Sculpting:
I sculpted the model in Nomad Sculpt on my Ipad and tidied things up in blender. I am still a massive beginner with sculpting so I incorporated pieces from some other freely available models to assist me (these are credited in the listing with the model). You don't have to worry about this part!
Printing:
I printed this on my MARS ELEGOO 2 printer. The settings I used for my print are included on the model listing; with these settings the model took about 7.5 hours to print.
The Files
I have uploaded 3 different file formats, a .stl, a .chitubox and a .ctb. An stl is the basic 3D model on its own, it can be opened in most 3D software if you are looking to edit it and it can be imported into any slicing software (slicing is the process of cutting any model into layers for the printer). If you use this file you will have to add the supports to the model yourself (supports are very important in preventing catastrophic print failure).
The .chitubox and .ctb files are specifically from the slicing program I use which is chitubox. The .chitubox program is for the model with the supports for printing attached and the .ctb file is the sliced file that is ready for the printer. VERY IMPORTANT TO NOTE is that these two files are sized and prepared based on my 3D printer dimensions. If you want to use these files, I recommend checking either files in chitubox (and have it set up for the model printer you will be using) and checking the size before going ahead with printing. If the size is too big for your printer you will have to resize the model and add the supports again but you can use the files I have supplied as reference.
I specifically used Chitubox 64 for this as Chitubox basic hates me and won't slice the model so it is solid inside. Printing something solid is easier to print than printing it hollow and trying to cure the resin trapped inside/drain the model (uncured resin is nasty nasty and will also generate gas that builds up pressure and will crack your print).
I recommend using either the basic stl for printing or starting with the .chitubox file and setting up the slicing settings by yourself. The ctb is a good reference for how things should look but probably not the best starting point to guarantee a successful print. If you add supports yourself, I recommend looking up some youtube videos on how to properly support a model, and what parts of a model need the most support and avoiding visible marks on your models from supports.
Post-Printing
Its important to clean and cure your print properly after its done, but if you are getting it done at the library or somewhere else you may not have to worry about this.
To remove the supports I used a heat gun to warm and soften the resin supports and little clippers my friends use for gundam to cut them as flush to the model as possible.
The next thing you want to do is sanding, sand down the marks from the supports, any lines or imperfections from the printing. Resin is relatively soft so this is not hard. I personally bought some cheap sandpaper that went from 400-1000 grit, glued it to icecream sticks, disposable knives and some flat toothpick things and used that to get into small crevices. Sand with wet paper to prevent resin dust going everywhere.
Painting
After sanding I sprayed the model with a primer, I specifically used Mr. Finishing Surfacer 1500 in white. This was my choice simply because its what my local gundam store had and I chose white because I didn't want to use a darker base coat that I had to lighten for the armor (simply put most of the model is white and white is a pain in the ass to paint opaquely)
After this I went in with my standard run-of-the-mill acrylic paints. The key to getting a smooth finish with no brush marks and lumps is to thin/smooth out the paint a little with water and build up the colour in layers.
I painted my base colours (white for the armor, black for the shoes and visor and a dark grey for the suit underneath the armor). To get a cool beaten-up effect I laid some light blue into areas on the armor where shadows would fall, after that I dabbed panel line accent colour which gets into the crevices and lines of the print and accents them (you can also just use really watered down black paint for this, I was lucky to borrow supplies from a warhammer 40k friend). I also covered parts of the armor with it and rubbed it off for a grimy effect and then dabbed some brown paint in for extra colour variation. I then came in and dry-brushed some lighter colours on the dark areas and fixed up the white where I wanted it brighter.
Then finally I coated the whole thing in a matte varnish to protect it and it was done!! My own Murderbot completed!!
Hopefully if you haven't done something like this before, this helps you get started There are dozens and dozens of great tutorials out there for more info or if you want to take your design in a different direction to mine.
Most importantly?? Have fun!!
If you have any issues or questions feel free to message me and we can work on it together!
222 notes
·
View notes
Text
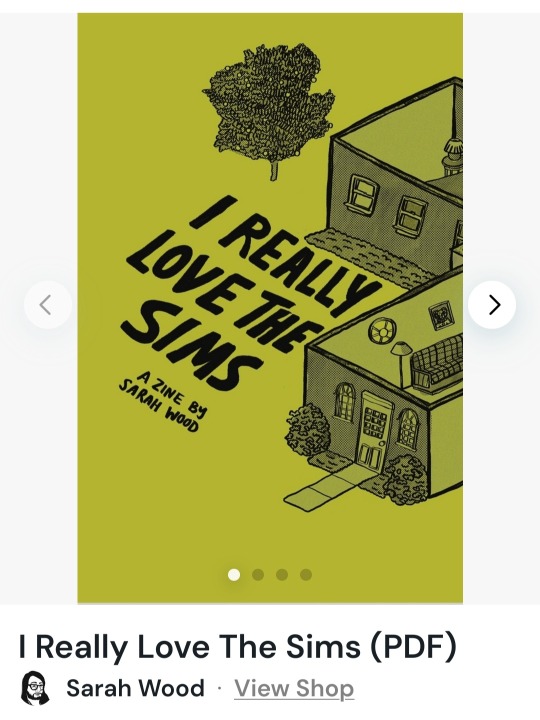
it's finally here! in celebration of the 25th anniversary of the sims series, i present my big, dumb labor of love.
"i really love the sims" is a 64-page love letter to the sims franchise, spanning all 4 mainline titles as well as a collection of my favorite sims spin-off games.
topics covered in the zine include:
the wild history of developing the sims 1 and how a rumored unscripted lesbian kiss saved the game from obscurity
the importance of a free and accessible modding scene for sims games and the necessity of archiving old sims content
how the sims games have always served as a tool for exploring gender and sexuality
a measured response to the sims 4
a celebration of my favorite sims handheld and console games
a bibliography with further reading, listening, and viewing recommendations
and much more!
the digital version of this zine is free/pwyw! part of what makes the sims series so special is the massive amount of work made available for free by passionate modders and custom content creators. from new hairstyles and clothing to entire gameplay expansions and custom software, their generosity has been foundational in fostering the creative community that surrounds these games and it's what has inspired me to release the full zine online for free. i spent dozens of hours writing, editing, and designing this zine, but it's nothing compared to the thousands of hours i've spent downloading custom content for the sims.
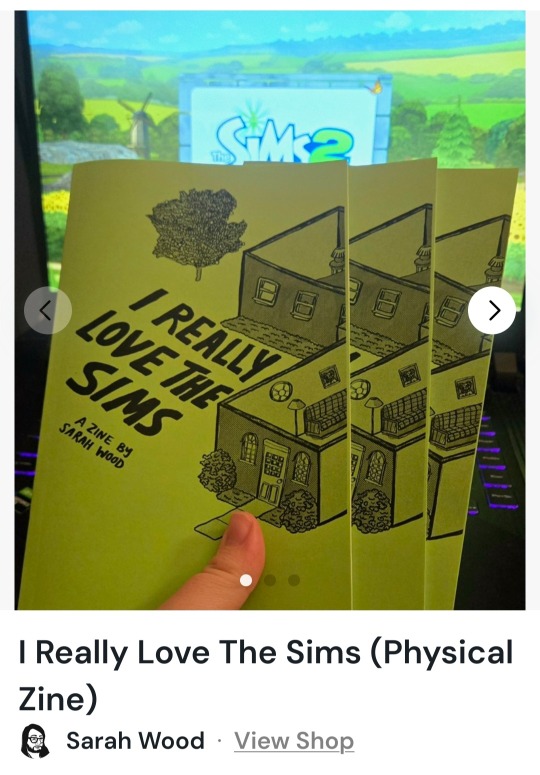
physical copies of the zine are also available for purchase! they've been gorgeously printed in black-and-white by a local printer and make a lovely, tangible token of affection for the series. the physical version of the zine is $10 and ships to anywhere in the united states (because i don't know how to ship/price for outside the US and i'm scared)
you can download the digital version here
or buy a physical copy here
and check out my other zines here
thank you so much for all your support and thank you to the amazing sims community online. the games wouldn't be the same without all your love and support ❤️
192 notes
·
View notes
Text
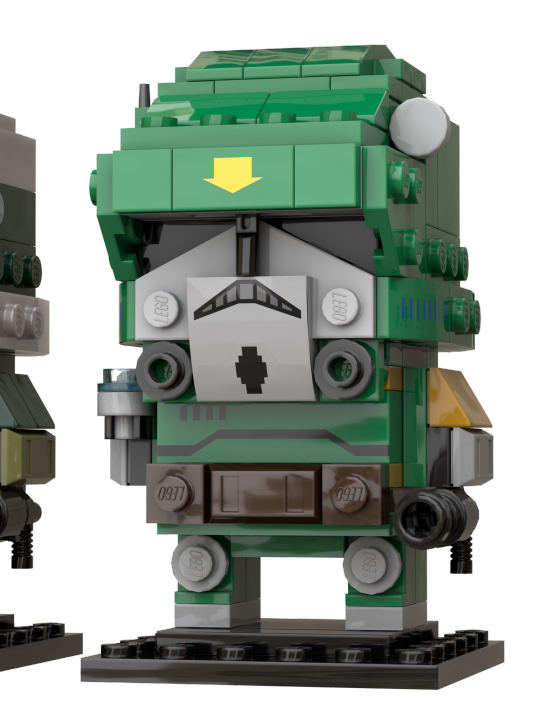
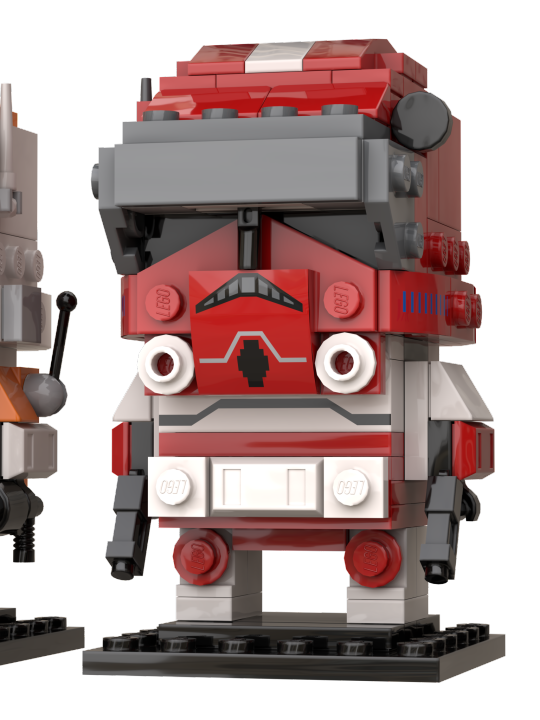
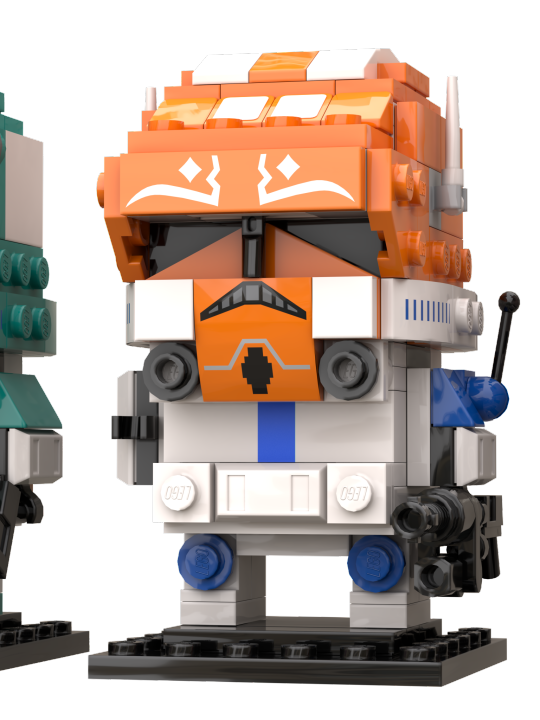
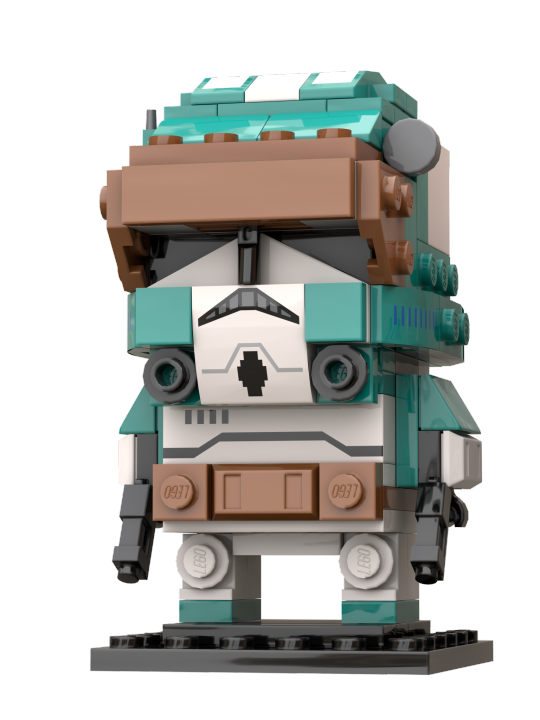
✨More Clones Brickheadz !✨
Since I acquired the Small Cody (40675), I found that there was an untapped mine. Why would they only make one ? Well. I don't have an answer to that, but I decided to take matters into my own one; so behold : 11 more. I went mostly for commanders here, but then I went a bit astray and so I added some captains to the mix.
In order, row by row :
Tukk (Not cannon but the colours are so beautiful)/Vaungh (died too soon-)/Rex (obviously)/Fordo (I did Rex, so I had to)
Gree/Doom/Thorn/Neyo
Bly/Cody/Fox/Wolffe
It was a really fun project, and I hope to do more of them in the future - maybe even phase 1s, some day~); supposedly not commanders because I did most of them (except Bacara, I know...The helmet was too tough).
And because I really like challenges, if you want to see another clone turned into one of these (Be it cannon or one of your ocs) feel free to send requests in my aksbox !)
Anyway this post is already far too long for anyone's dashboard, so closeups and details will be under the cut !
Let's start with the easy ones : Cody, Doom, Fox, Thorn

Obviously, Cody was easy, I just rebuilt the original one virtually - Nothing too hard. The printed pieces here are not the right ones, because Cody's are not available on STUDio yet, but the storm trooper ones were relatively similar, so I used these for most of these models. Of course, it means I'm lacking the sun bands, and a few other distinctive elements, but it works well enough for now.
Now, Doom is essentially a colour variation (minus a few antennas). I also used an old space piece, which has this big yellow arrow printed on it. I's not exactly what Doom has, but I feel like it's close enough for a first attempt.
Then, Fox is relatively similar to Doom, but with two DC-17s. I also moved the printed torso brick up to get that red line he has.
Thorn works in a similar way to Cody too, except I removed both accessories on the side of the helmet. I also added this tile with diagonal lines to figure the wings he has. One day I'll slap some real wings on there, but I haven't found the right image yet. I also gave him a Z-6, obviously. I really like it, so I might actually make that one physically, because the way it's build (with old binocular pieces) is pretty nice; although I doubt the pieces are available in black.
Moving on to two captains : Vaughn and Tukk !
Admittedly, not really that different either, except for one thing : I learnt to do custom prints now ! Yay ! Well, these are really basic : the blue line for Vaughn, and some trapezoids for Tukk's helmet (which are, indeed, not visible here - shame, I spent so long making these fit). The Ahsoka pattern was already in STUDio (because Ahsoka already has her own brickheadz, which I'll get my hands on someday~)
I must also add that having some cyan in this whole thing added some much needed colours in here, I'm grateful some people give their clones amazing colours (If somehow someone doesn't know who Tukk is, well just check High Ground Animation. Right now. It's really cool, trust me). Anyway.
As for design changes, I modified the faces slightly by adding 1x1 tiles, to allow for different colours variations on the face. It makes them look slightly blockier, but given the overall size of the head, it doesn't do much.
I also gave Vaughn a DC-15A. It's a bit messy, but it works out well enough. Past me forgot to render it, so here is a raw, in-software picture of it (from Fordo(s hand, but it's the same design for both) :

BARC helmets ? Wolffe, Fordo, Neyo

As I've been told, these look a bit wonky, and I'll admit its wasn't exactly easy, but in my defence, it's relatively hard to get such round shapes with bricks (lego cheated by adding the visor). Anyway, given that doing that with a printed piece was out of the question, I tried to replicate the filter's shape with actual bricks, and I used a printed piece which, technically, is Lando's moustache, but downward. I'd say it does the job relatively well.
I also added a rangefinder to Wolffe, which is a little big compared to everyone else's antennas, but It's still relatively to scale with the head itself. No custom prints for him (not sure where I would find the correct pattern images ?), but I've done it for Fordo and Neyo. Fordo obviously has his well deserved Jaig eyes (and who knew it would be that difficult to find a picture of that on internet ?), and Neyo has his symbol on the helmet, chest plate, and the shoulder not shown here.
The really tinkered ones : Gree, Bly, Rex :


Here, it was a matter of trials and errors to figure out just how to get the shapes right.
I actually started with Bly, by removing the previous visor and adding the macrobinoculars first, then I tried to shape the helmet around. Truth is, it doesn't make sense technically : the two separated parts of the helmet do not connected at all, if you remove the equipment. Luckily, no one has to know that.
Next is Gree. It took me some time to figure out how to properly get a round feel, but I feel like it's as good as I can make it like this. Colour-wise, it was surprisingly difficult to find how to balance the different shades of green, and equally hard was to figure out which silvery colour would render well in STUDio. The answer lied, as it always does, in Bionicle. Of course, none of these pieces exist in this colour, but it's not really my main problem (because none of the coloured printed pieces exist either).
Finally, Rex...He gave me some trouble, I have to admit. Firstly, the part-designing software decided to have some trouble with custom prints, which was problematic, because I simply couldn't do Rex without jaig eyes (and Fordo already had his). Then, I started with Gree's base and tried to go from there to fit Rex's custom helmet. I ended up using Boba Fett's printed visor piece for Rex, because these were all triangles. I also got rid of the printed chest piece and used some black plates to simulate the pouch he has; while also adding a a few more custom printed pieces for the arms and pauldron (barely visible, but they're here. I'm not entirely happy with it, but I don't see much other solutions than more and more custom prints, which isn't my goal, so it'll stay like that for now.
Anyway, that's way too much rambling for one post, so I'll just end by saying that next week I'll post an alt version of this whole build [here !], with some 'slight' colour alterations. Definitely nothing big.
#lego#lego moc#tcw#lego clone wars#the clone wars#captain rex#captain tukk#captain vaughn#captain fordo#commander cody#commander fox#commander thorn#commander wolffe#commander bly#commander gree#commander doom#wow that's too many tags-
235 notes
·
View notes
Text
Here's everything from my part of the POPSTAR'S SUPER ULTRA SCRAPBOOK ZINE @popstarzine!!! Everyone worked really hard on their artworks so check it out :)
First we have the final artwork!
With and without the spotlight :D Everything, except the spotlight, was done using traditional mediums and scanned individually. I'm really glad I could be a part of this and it being my first zine.

Take a look at the process video
Keep reading for details :o
Concept sketches and final sketch before painting
The sketch has the list of enemy characters and a few different thumbnail sketches of Dedede. The gist of the artwork was to show the characters working together to set up the fighting ring for the fight that happens in game with the 4 small paintings. With the middle painting being Dedede in the decorated room. I re-sketched 2 of the small paintings I was having trouble visualizing and some background and foreground bits.


This sketch was the original sketch for my piece before I was told I needed Dedede in it. I plan on coloring this, but I'm busy so it will just have to be a sketch for now.

Background and foreground
The background pattern is the pattern from the sides of the fighting ring, but without Dedede's face and symbol. It was made with alcohol markers and the white lines are painting with acrylic pen.
For the foreground, the light purple drape is from where the crowd sits, and the side banners are from the main fighting ring. Both painted with gouache with the side banners having paper stars I cut out using my Cricut and drew the gold with a pen. The bottom part of the foreground is the ropes and poles of the ring.


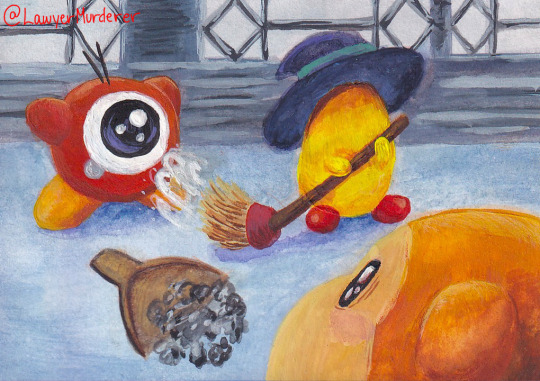
Paintings
Top left - The area the Waddle Dees are in is the room before the fight Dedede
Top right - Noddy and Simirror are on the covering the sides of the stage, but Noddy fell asleep and is not being helpful.
Bottom left - They are on top of the stage but looking up at the support beams
Bottom right - Also on top of the stage, but it is angled facing downward
Middle - I thought it would be funny if Dedede used his strength to step down on the ropes. Also, do you notice that Mario and Peach are in the crowd?


Stickers, stamps, & paper
Stickers - I lied when I said everything was made using traditional mediums >:) the stickers were drawn digitally, printed and rescanned. Yes, they're actual stickers and I will stick them on to everything.
Sticky note & breezes - Words on the sticky note were carved out of rubber carving blocks and using ink to stamp it onto a sticky note. The breezes are from the start screen of string breeze and are finger painted on paper with ink
Wax stamp - wax seal was also carved from rubber carving blocks. Scanning the wax stamp was difficult because it wasn't flat, so I took a picture of it instead


Scanner & Editing software
For the scanner, I used a Canon Lide 400 scanner and for the price it's a pretty good, but this is my first scanner, so I'm not sure how other scanners fair.
I used Affinity Photo 2 on my iPad to put everything together. I originally used Procreate, but after seeing the quality I realized I needed a photo editing program. So I used the free trial from Affinity to make the final artwork. Original I wanted the final piece to have a white border but decided against it and instead added shadows to make it look like a spotlight. Also added some shadows to some areas.

Everything but it's not scanned


Ok, thanks for coming to my art talk :D see you next time!
#get the zine#king dedede#kirby#sir kibble#bronto burt#noddy#simirror#waddle dee#waddle doo#broom hatter#kirby series#kirby zine#art zine#watercolor#gouache#painting#illustration#artwork#affinity photo#my art#finished art
43 notes
·
View notes
Text
How much should it cost to be a writer?
It depends what route you’re taking. If you are planning to go for traditional publishing, which looks like you finishing a manuscript and then querying agents who will then take your book to publishers, you should be paying for basically nothing. One exception would be if you decide to hire an editor to get a pass over your manuscript and/or query package before sending it off, but this is not required.
If you are in the process of trying to get your manuscript traditionally published, you may be approached by a “publisher” offering to publish your manuscript for a fee. THIS IS A SCAM! An author should never be paying for “publishing services.” Anyone asking you to pay for your own printing, marketing, etc. costs is taking advantage of you. These are called vanity publishers and they will not turn you a profit, help you attract readers, or provide you the prestige of being published.
Always check on Writer Beware - search for the name of the person or company. You can also just google that name along with the word “scam” or “reviews.” In general, don’t let yourself be blinded by dreams, or let yourself be convinced that something is a good idea because you really want it to be true. Never, ever, ever pay a publisher.
If you are going the self-publishing route, you will be paying for certain things, but none of those should be payment to be published. You are the publisher. Uploading your manuscript to Amazon or other marketplaces is free. However, you will be paying for things that a publisher typically pays for. This could include:
-Cover art - you could do this yourself, though this isn't recommended. A good cover is key to a book's success, so budget to purchase a pre-made book cover, or hire a professional cover artist.
To find pre-made book covers, you can just Google "premade book covers," or check one of these sites: BookCoverZone RockingBookCovers Beetiful
And here's a list of places to buy both custom and pre-made cover designs that's a good start. You can also check Reedsy and Etsy for people listing cover design services. If there is a self-pubbed author whose covers you love, try asking them what artist they use.
-Formatting - you could do this yourself using a formatting program like Atticus, or you could hire someone who does professional e-book formatting.
Here's an article on the turbo-DIY route. Here's a list of formatting programs you can use. To hire someone, you can simply search for book formatting services or look at places where people list such services for hire, like Reedsy, Fiverr, or certain Reddit boards.
-Ad campaigns - you may want to pay for ad campaigns on platforms like Meta or Amazon. More niche, author-specific platforms like BookBub, Book Funnel, or Book Sirens also come with certain costs.
-Author services - you may wish to hire an expert in things like marketing, blurb copy, social media metrics, newsletter management, etc. You can find information on that here.
Be aware that scam publishers might try to pitch themselves as "author services" - you should be paying someone to help you with specific aspects of your self publishing work, NOT paying to be published.
-Software and platforms - whether it's a subscription to Duotrope, a paid Scribophile account, access to pro Canva features, etc. you may decide to pay for tools that you will use to do your work well.
-Expert advice - some people offer courses, books, or other resources on how to do specific things like write a compelling blurb or run an effective ad campaign. You may notice that a lot of the links I shared here will include upsells from people doing exactly this!
Be very cautious about this, as most of these people claim that they make tons of money on their self published books, but really, they make their money selling this stuff to people like you. Always check out a person’s free resources first, and wait to invest in this sort of thing until you have a specific question you need answered or are trying to do a very particular thing that you need granular guidance on.
One thing you should NOT pay for is a review, feature, or interview. Self-published authors will be approached by a lot of scammers who claim that, for a nominal fee, they will share information about your book to their huge audiences. These are completely useless and a waste of money. Never spend money on this.
Always keep track of what you are spending on all of this. You may be able to deduct it from taxes you pay on your income from writing, and you will want to really understand what your profit margins look like.
68 notes
·
View notes
Note
That National Geographic leather binding for Yellowstone is fucking Gorgeous!!! (Pardon my Language)
How long have you been binding, and what would you recommend to someone who wants to try it for themselves?
hello and thank you so much!! I worked really hard on that one (and no pardon needed haha)!
I started binding in February of 2021, which means in a few months I'll have reached 4 years. It's been an awesome journey!!
If you'd like to try it for yourself, I'd recommenda few things!
1) You can 100% try out the basics with near free or cheap materials. People typeset in Word or Google Docs or Pages. You can print on printer paper & use regular sewing thread & scavenge board from old books or notebook backs or do a limp leather binding & use no boards at all. You can make paper pamphlets. Any comments I make following this are about my preferences for best results. The most expensive part that cannot be avoided is printing. On the other hand expenses can wildly escalate if you're committing to it; once you are doing leather it becomes somewhat unavoidably expensive.
2) Check out some tutorials from SeaLemon or DAS Bookbinding on YouTube for the physical construction. SeaLemon is really clear for a beginner starting out, but then I'd move to DAS for better technique (DAS also has a beginner series though). I watched DAS Bookbinding videos for three weeks straight before I was able to start, & while that doesn't maybe work out for everyone I do think it gave me a pretty strong basis of understanding for structural techniques. DAS is *really* good at explaining why he thinks you should do something. The structure of the NatGeo bind is basically DAS's video on a rounded & backed bradel binding (but with leather & sewn on recessed cords). There is some good stuff on Tiktok/IG, but watch short-form videos/reels with caution. They move a little fast and I've seen a couple give instructions that can result in structural flaws (not that this is unique to the form, cross-referencing on instructions from any source is a good practice). They are good for if you're looking for a specific technique (particularly modern decorative ones, like cricut use, edge gilding, HTV application). There are also published books you can buy or maybe request through your library, such as Hollander's Introduction to Bookbinding. Renegade Bookbinding Guild runs a whole bunch of technique-specific in-house zoom classes annually.
3) Look to other fanbinders for tutorials on how to format the text (this is because most pro bookbinders do not do both text design & book creation! it's a pretty unique feature of fanbinding). @renegadeguild has some publically provided resources on our website here and more typesetting tutorials for a whole host of softwares (Affinity Publisher is my choice - one time purchase, fuck you very much Adobe InDesign) located in the discord server. Anyone 18+ can join the Discord. The NatGeo inspired book (text & dust jacket) was created in Affinity Publisher.
4) Join a community of fanbinders! It's really lovely. The space has exploded & there are tons of people to be friends with, trade tips, & cheer each other on. I'm part of @renegadeguild and we do a whole bunch of events throughout the year, and we have an in-person retreat every other year. I've met with over 20 different renegaders so far, in three different countries, and it's been such a blast. Definitely the community helps keep up the motivation. Renegade isn't the only community out there though! There's groups more rooted in IG/tiktok circles that have their own discords, plus a number of FB groups. I do think most people who are comfortable on tumblr enjoy Renegade's vibe.
5) While I learned most of what I do online, some things really benefit from in-person learning. If you want to do leather binding I would really recommend trying to take an in-person class. I did two attempts at a leather binding on my own before I decided to hold off until I'd had at least one in-person class. Leather binding can be extremely frustrating, especially when you can easily end up with a book that looks worse than a cloth binding at your same skill level but for double the cost. Imo this is mostly because the leather specific skills like paring, warp management, and assessing a random piece of leather for bookbinding suitability are all pretty tactile experiences, all of which are difficult to assess through a screen and can result in an unpleasantly bulky/stiff/shapeless book if ignored. For example- while this book of mine is a pretty popular post, I don't enjoy holding it and reading it, especially in contrast to the NatGeo bind. Part of this was the material I chose; part was not being able to adhere to the instructions quite well enough; part was just not knowing enough about what I was doing; part is they're different constructions. This might just be a me thing though; I'm sure others have had success with online only tutorials for leather.
6) I'm not going to get into specific tools bc that could be a whole post, but some things are necessary (printer access), some things are necessary depending on style, some things are "makes life easier but only drop the money if it's stopping you from making books out of frustration", some things are just technique-specific tools. Examples - sewing frames are often brought up but are never necessary unless sewing on cords; cricuts & cutting machines are commonly used in fanbinding circles but I don't have one (& don't intend to atm).
7) Don't be shy to offer the author a copy!! Like other fan activities, fanbinding is part of our fandom community ecosystem. Your fanbinding is in communication with the author's story. Giving a bind to the author is a great way of keeping the ecosystem going. I tend to think of binds as a combo of comment, fic rec, and fan art inspired by the fic.
8) Paper grain sounds stupid but it IS IMPORTANT! My personal hierarchy of give-a-fuck for grain: Board grain, spine card grain, endpaper grain, cover paper grain, text block grain, book cloth grain. The only thing I personally sometimes ignore is book cloth grain; but many people will not worry too much about text block paper grain.
Gonna stop there for now. If you've got specific questions or want elaboration, feel free to ask. As with all things, YMMV, this is my own opinions/experience and may not apply in all cases. There's a whole lot of different techniques out there, and it's hard to ever say something is wrong, per se - but I think it's important to understand if a method has an outcome you may want to avoid. Prioritize your goals & adapt for them - what's your goal? Longevity, readability, aesthetics? You might make different choices depending on them. My choices influence the techniques I chose to focus on, the tools I buy, and thus the final aesthetic of my binds.
32 notes
·
View notes
Text
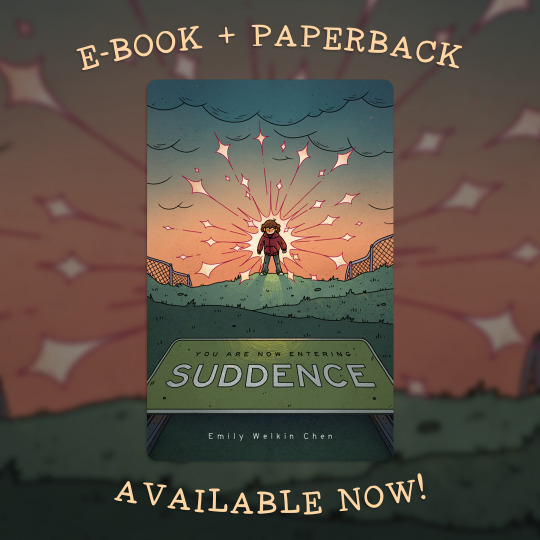
✨YOU ARE NOW ENTERING SUDDENCE is now available for purchase!!✨
While Suddence has been free-to-read online for a while now, perhaps you prefer the comfort and convenience of an e-book or physical book. Now, you can have exactly that!
You can find Suddence on a number of vendors, including Amazon, Barnes and Noble, and more!
Plus, if you order between now and May 19th, you will receive some extra goodies!
If you purchase an e-book, you will receive a digital advanced look at the bonus comic, THE RABBIT INCIDENT, and a high-quality version of Suddence's back cover, which has woefully been covered up by the blurb and ISBN.

If you purchase a paperback, you will receive these pretty stickers and a print of the back cover.

The goodies will also be available to purchase on Etsy*!
To receive these gifts, please fill out this Google form! The gifts will be sent out in batches, so don't worry if you don't receive them right away!
There will also be a giveaway announcement in a bit! Keep an eye out for that 👀

As usual, reblogs are appreciated! The very existence of links in this post means it most likely won't show up in the writeblr tags.
Notes below the cut:
*To be uploaded in the coming days! E-book goodies will be $5 CAD, and paperback goodies will be $10 CAD.
Also, as a general note, this is my first time creating e-books, and I used Draft2Digital's automatic formatting software to create them. If you notice any egregious issues with them, please do let me know and I'll see about having them fixed!
Suddence is also reportedly up on a number of online library services, such as Bibliotheca, OverDrive, and Baker & Taylor! Unfortunately, I don't have any experience with online library services. I've checked OverDrive and was told the book was not available despite it technically existing on there.
If you live in/around Vancouver BC, I will be at VanCAF on May 18th and 19th with some copies of this book (with the freebies too)! If you want to bypass the shipping fee or you just want to see cool art, come on down! It's a free event :^D
72 notes
·
View notes
Text
How to Get Selfship Merch and Art with Low or NO Budget
*Okay, kinda misleading title as many of these are DIY but they can be cheap or free depending what materials you have access to. These are just some basic ideas I hope will inspire people to try their own things.
Feel free to add any ideas you have, too!
Things you can get/make for free
Picrew / Dressup games
I’ve seen some couple/romance picrews before!
I don’t always find the options I want in Picrews (ie body type) but you can always edit them using free software like Autodesk sketchbook, gimp, etc
Wallpapers
If your f/o is popular, you might be able to find some good phone/desktop wallpapers by searching online
Edits
There’s free apps for editing selfies where you can put in a photo and add in filters, stickers, etc. (Not my area of expertise, also may not work as well with animated f/o’s)
Free apps for video editing - I see a lot of edits on Youtube and Tiktok for example
Making silly edits where you put your ship into existing memes
Free art?! - Artists doing art requests / free art for experimental purposes
(Search for “art requests: open”, only ask if people offer first)
Free art?! - You can draw whatever you want, whenever you want
Apologies if that sounds condescending, but that’s often the thought that motivates me to draw selfship art when I do. No one can stop me from drawing myself kissing my f/o!
If this is daunting, try breaking it down into smaller steps. Search for tutorials on how to draw your f/o, or how to draw romantic scenes, etc.
Misc arts & crafts!
Whatever you have on hand you could make - especially in your f/o’s colors! Or things you associate with your ship
Sometimes schools and libraries have free events where they let people make things free of charge - check out your local library’s site! They’re always open for feedback, you can email suggestions for events.
I’ve seen events where they let you paint, make friendship bracelets, make buttons with their button machine, etc
For example my uni had a “destress from finals” event where you could make bracelets with plastic beads (like kandi?), and I made one with my friend’s f/o’s name and color scheme.
Things you can get/make for cheap
Keychains! Get one of those keychains where you can put a photo in, print out or draw a pic of your beloved, and put that bad boy in there
A lil character shrine! It doesn’t have to be huge
A good place to start could be a photo of the character and little trinkets you associate with them. Like an eraser shaped like their favorite animal or a candle in a scent that reminds you of them.
154 notes
·
View notes
Note
What kind of work can be done on a commodore 64 or those other old computers? The tech back then was extremely limited but I keep seeing portable IBMs and such for office guys.
I asked a handful of friends for good examples, and while this isn't an exhaustive list, it should give you a taste.
I'll lean into the Commodore 64 as a baseline for what era to hone in one, let's take a look at 1982 +/-5 years.
A C64 can do home finances, spreadsheets, word processing, some math programming, and all sorts of other other basic productivity work. Games were the big thing you bought a C64 for, but we're not talking about games here -- we're talking about work. I bought one that someone used to write and maintain a local user group newsletter on both a C64C and C128D for years, printing labels and letters with their own home equipment, mailing floppies full of software around, that sorta thing.
IBM PCs eventually became capable of handling computer aided design (CAD) work, along with a bunch of other standard productivity software. The famous AutoCAD was mostly used on this platform, but it began life on S-100 based systems from the 1970s.
Spreadsheets were a really big deal for some platforms. Visicalc was the killer app that the Apple II can credit its initial success with. Many other platforms had clones of Visicalc (and eventually ports) because it was groundbreaking to do that sort of list-based mathematical work so quickly, and so error-free. I can't forget to mention Lotus 1-2-3 on the IBM PC compatibles, a staple of offices for a long time before Microsoft Office dominance.
CP/M machines like Kaypro luggables were an inexpensive way of making a "portable" productivity box, handling some of the lighter tasks mentioned above (as they had no graphics functionality).
The TRS-80 Model 100 was able to do alot of computing (mostly word processing) on nothing but a few AA batteries. They were a staple of field correspondence for newspaper journalists because they had an integrated modem. They're little slabs of computer, but they're awesomely portable, and great for writing on the go. Everyone you hear going nuts over cyberdecks gets that because of the Model 100.
Centurion minicomputers were mostly doing finances and general ledger work for oil companies out of Texas, but were used for all sorts of other comparable work. They were multi-user systems, running several terminals and atleast one printer on one central database. These were not high-performance machines, but entire offices were built around them.
Tandy, Panasonic, Sharp, and other brands of pocket computers were used for things like portable math, credit, loan, etc. calculation for car dealerships. Aircraft calculations, replacing slide rules were one other application available on cassette. These went beyond what a standard pocket calculator could do without a whole lot of extra work.
Even something like the IBM 5340 with an incredibly limited amount of RAM but it could handle tracking a general ledger, accounts receivable, inventory management, storing service orders for your company. Small bank branches uses them because they had peripherals that could handle automatic reading of the magnetic ink used on checks. Boring stuff, but important stuff.
I haven't even mentioned Digital Equipment Corporation, Data General, or a dozen other manufacturers.
I'm curious which portable IBM you were referring to initially.
All of these examples are limited by today's standards, but these were considered standard or even top of the line machines at the time. If you write software to take advantage of the hardware you have, however limited, you can do a surprising amount of work on a computer of that era.
44 notes
·
View notes
Text
I have sort of made fun of Eisenberg’s philosophy as a quirk of crypto, but I guess that’s not really right. It’s a quirk of music streaming platforms too, and online advertising markets, and financial markets. Basically much of modern economics, and life, has the following characteristics:
1 Everything is intermediated through some depersonalized automated electronic exchange. 2 The automated electronic exchange has a mechanism — how it actually works, what the exchange’s software allows you to do — and also rules, the terms of service regulating how you can use the mechanism, which are fuzzier than the mechanism and written in small print, things like “don’t do fraud” or “you have to be a human” or whatever. 3 The mechanism is much more legible and salient than the rules, and in a depersonalized electronic world people treat the mechanism as the rules: They don’t believe that the rules exist, because the rules seem to contradict how the service works. The basic description of Spotify’s mechanics suggests Smith’s alleged arbitrage; if he didn’t do it surely someone else would.
Everything is like this. We talked last week about the “infinite free money Chase ATM glitch,” in which people on TikTok discovered that if they wrote themselves a fake check and deposited it in an ATM and then withdrew the money, they’d have “free money.” Everyone used to know that (1) one way to get free money was to write a fake check and trick someone into cashing it but (2) that was obviously a crime. But now you don’t have to trick anyone into cashing the check: You just go to a machine and put the check into the machine, and if the machine gives you back money then surely that’s just how the machine is supposed to work?
14 notes
·
View notes
Text
It feels so anticlimactic after years of working on it but I think at this point I’m about as done with my novel as I can be. It’s been written, rewritten, edited, read and edited by people other than me, printed and line edited by hand, checked with various editing softwares, and at this point I don’t think I could reasonably do more with it than I already have. I think it’s basically done now. All that I really have to do now is wait for the cover and artwork to be done (👀) and kinda dress it up aesthetically (I’ve started playing with some of the final formatting but it’s hard to do without those components as anchors) then I’ll hopefully be sharing a preview of the first ~15 pages for free alongside an actual release date for both a physical and digital version. Whew.
17 notes
·
View notes
Note
apologies if you've already answered a similar question on here, but what software + brushes do you use? your lineart is so beautiful <3
hi hi !! i'll try to do a rundown of everything, but let me know if i miss something. ☆૮꒰•༝ •。꒱ა
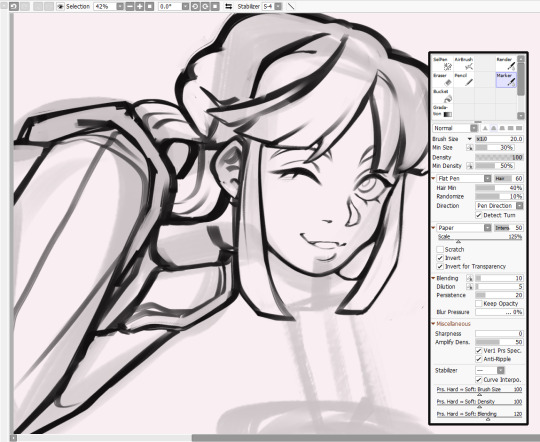
I pretty much only use these two brushes: 'Marker' : sketching, 'lineart', occasionally rendering. 'Render' : rendering only.
Now, in terms of software and the more technical stuff. Software : Sai2, I've used Sai and FireAlpaca before though. Tablet : Huion Tablet, Inspiroy H1060P ( pretty sure ).
I use a DPI, sometimes called 'printing resolution', of 300. And I start with a canvas size of 4000x5500, though I usually crop it when working on the sketch and composition. Canvas settings specifically, cause I never learned about these, I recommend using higher DPI and size in general. -- If you're intending to make something physical out of art ( prints, charms, stickers, etc. ) you should look up sizes for recommendations for what you're doing specific.
I also use 'layer effect' afterwards, specifically setting the 'paper' as well... paper. Whether you pick paper, paper A, or paper B ; it really doesn't change that much since they're pretty similar. You could also use any of the 'pastel_texture' ones if you want something more noticeable. If you want to check how one looks, turn up its settings and use it on a plain, light to mid-tone color and click through them. It should make it easier for you to look at how it'll look.
Like I said, if I missed anything, or you got any more questions, let me know !! I know some stuff in my ask box disappeared ( like ... 1-3 at least ), so if I don't answer an ask, feel free to spam my inbox or DM me till I see it. Between that and weeding through scams is just blegh.
#roach talk#digital art#digital artwork#digital illustration#brush#brushes#brush settings#sai2#paint tool sai2#ask response
10 notes
·
View notes
Text
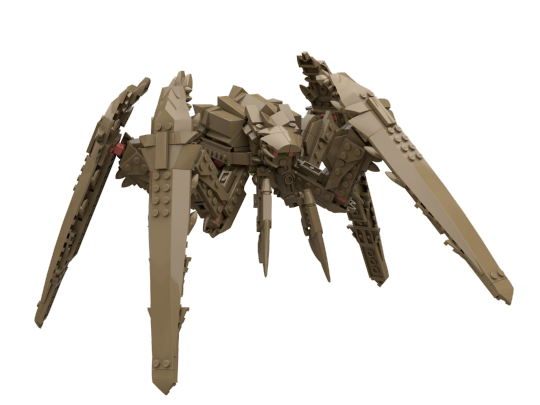
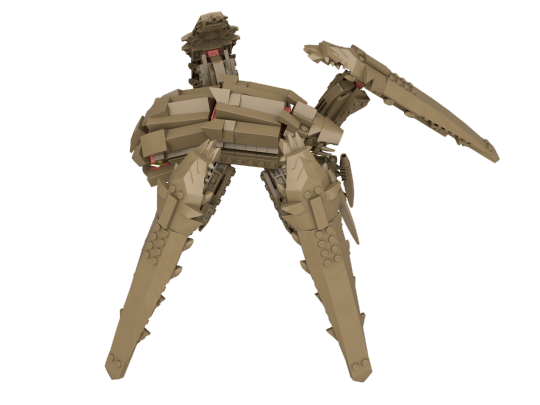
✨Bile titan✨
Or the fact that I don’t have access to real legos anymore will not stop me from making mocs (more on that under the cut).
I’ve really enjoyed Helldivers and I’ve been meaning to make one of those for some time, now. And I think it turned out quite alright, all things considered. It’s a shame this happened he will never physically be on my shelf, but it’s better than nothing~
Anyway, details and rumbling under the cut, as always.
Here are more viewpoints :
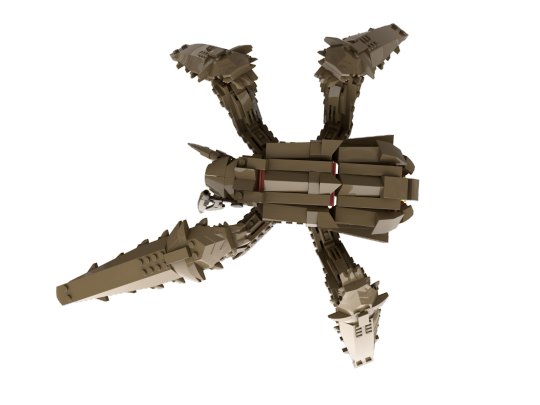


Most of the parts here are articulated, although the head barely moved, and the second joint of each leg is fixed, because making it movable with this size would have been a hassle.
Though, it still has a lot of posability (even the small pincers move !).
The bottom is not really detailed, because it won’t be seen much, but I’ve still added a few things, including the protuberant bile sack underneath, because it gave me a great excuse to use an alien egg, which used to be an incredible piece.
Now though, let’s deal with what this isn’t : real.
It’s fully made with Bricklink’s Studio, which is a free computer software giving one access to pretty much all the bricks you can think of, without limitations on colour (this is great, because 99% of the pieces I use here do not exist in the colour scheme I used). It also comes with a part designer, to create custom prints and/or bricks. There aren’t any prints here, but I am working on something else which uses them.
The only down part is that I can’t use any illegal technic, which is a shame since I usually rely on those a lot (check my post about the Citadel and you’ll understand~). It does make sense, though, and custom rotations are allowed, so it’s not all bad.
Also, if you’ve read until there, congrats ! I do have one more thing to say, though. Given that I know have access to an infinite amount of bricks, I can take requests, if you ever have an idea you’d want to see realised (albeit note it might take a while !).
16 notes
·
View notes